Showing posts with label tutorial. Show all posts

Thursday, June 23, 2011

Image Cropping: Dissection vs Trimming

Since I'm stuck in bed here at the
hospital I have had a lot of time on
my hands to play with images on my 
laptop for my pendants.

I have noticed that cropping can be
a very important tool in the image 
refining process.
There are basically two ways you 
can use image cropping.

The first,
is to use cropping as a way to get 
a new image from a much larger one.
Essentially dissecting out a part 
of the image.

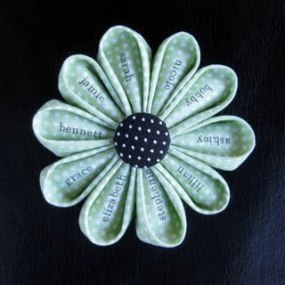
Take this image for example:
It's a really pretty picture and I 
can actually cut it to get a couple
smaller images.

This is from the top right 
segment.

And this is from the 
top left segment.

This is what it looks like
when you are done.


Sometime you have an image you want
but you need to trim it down to make it fit.
Like this image:
I picked this one for a friend who
loves Alice in Wonderland. 
I love the vintage image.

When I shrunk the whole image down it 
looked like this:

Even with some cleaning up
I lost alot of the detail 
and focus of the image

So I cropped the image in closer
concentrating on the important part
of the picture, being the face and upper body.
And trimmed away the excess.
See how much nicer that
image is?
And you didn't really lose anything.


The finished product looks pretty good
except for a tiny air bubble.

Does anyone else make their own pedants?


Tuesday, June 21, 2011

How To Make Images for Scrabble Tile Pendants


Scrabble tile pendants,
they seem to be all the rage right now.
My husband thinks they are a waste
 of a perfectly good Scrabble game.
But, he loves to play.
I think he likes it because he always wins!

A friend of mine was doing
some cleaning and wanted to get 
rid of her Scrabble game.
So I volunteered to "adopt" it.

Now that I had the tiles I needed images.
There are a ton of people on Etsy and other
places that are offering to sell you files 
or pre-made images. 

Don't be tempted!
It's really very easy to shrink 
down an image of your choice.
I mean isn't that the point of this craft?
To make personalized jewelry?

Alright, 
lets start with an image.
I happen to really like this one,
and since it is so famous and old no one
will be hounding me about copyright
infringement.

Use whatever photo editor your chose,
for my purposes I will use Picasa.


Now crop it into a roughly 
rectangular shape
Try to focus on one large image
that doesn't have a lot of detail.


Now shrink the image 
using the "Resize" function 
to approximately the same size 
as your scrabble tile.
I found that the best size was
65 to 70 pixels across.
I shrunk this one to 70 x 81
Notice that you have lost 
image clarity when it gets this 
little.


To fix this issue
use the "Sharpen" function 
and boost it way up.
Notice how much clearer the
image has become.


Then go into the "Color" function 
and up the saturation. 
After that use the "Exposure" function
and bump up the contrast of your image.
Trust me you want a little extra
color in the picture to make it pop.


I tried three images last night,
this is how it turned out after I glazed them.

Some tips:
  • Use images with bright colors, you get better results
  • Try to limit white space, pictures with color show up better
  • Don't use a highly detailed image, the detail gets lost
  • Experiment with where you crop a larger image, you may be able to use part of the image in a way you didn't see before.


I hope this was helpful,
later this week I'll post 
other How To's on how to 
make these pendants.

Stay tuned....


Smart and Trendy Moms


Saturday, June 11, 2011

Grab My Button!

I finally got around 
to making 
my 
very own
Blog Button!


NekoKnits


Kinda cute huh?
Please feel free to 
grab it and share some blog love
by copying the HTML code in the little box
and 
pasting it somewhere on you blog.

Would you 
like to know how to make one?
Ginger 
over at Ginger Snaps Crafts
has an awesome 
tutorial

BTW
If you are having problems
following via GFC
you can follow NekoKnits through 
Bloglovin
Follow Neko Knits
just click the flashing thingy!

Don't forget about our 
Giveaways!
(Just click on the giveaway buttons on the sidebar)


Monday, May 30, 2011

How to Monday: Tsumami Kanzashi

I hope everyone has enjoyed the Memorial Day Weekend, I know I have. While I was scanning the internet for some inspiration I came across a new trend that I struck very close to home.
Kanzashi flowers.

These are flowers made from little squares of folded material that are then sewn together. Very popular right now amongst crafters.

Did you know 
 it is a traditional Japanese art that is in danger or disappearing because of the lack of trained artists? 
There are only 5 artists that are acknowledged to be trained in the traditional art form still alive and practicing.

is a studio run by a Kuniko Kanawa that still produces authentic pieces of Tsunami Kanzashi. Kuniko herself was trained by one of the few Kanzashi artists and strives to preserve this piece of disappearing Japanese culture.

Here are a few images from her 

Karyu (Cherry Blossom and Drooping Willow) 

Tsumami Kanzashi Bobby Pin


Vintage Kimono Momiji 

 (Japanese Maple) Tsumami Kanzashi 

Hair Clip with Black Onyx


 set of Shou-Chiku-Bai 

(Pine-Bamboo-Plum Blossom) 

Tsumami Kanzashi for Maiko 

 Kanzashi of January


I remember being a child and pulling very similar hairpieces out of the big cedar trunk where the kimonos were kept in the basement in anticipation of Spring Festival at the JCCC

Please visit the Atelier Kanawa website, you will find a wealth of information about the history and culture of the Kanzashi flowers. Just by learning a little about what they are you are preventing a beautiful art from disappearing.

Want to learn how to make these beautiful flowers?
Here is a tutorial can be downloaded by Christina Stoppa
a big thank you to her for making this great tutorial free to the public.

Please check out her Etsy store


Monday, May 23, 2011

How To Monday: Waste Fabric Tutorial


Remember those monogrammed hand towels I showed you? 
I thought you might like to know how I did it.
Here's how you do it.

Waste Fabric Tutorial
Step 1.
Measure and cut out the appropriate amount of waste fabric.
Remember those blue lines indicate 
5 stitch increments, 
not the ten that are blocked out on patterns. 
I made this mistake.

 Step 2: Finding the center
Fold your fabric in half lengthwise.

then fold it in half width wise

This gives you the center of the material, 
mark it with a pin.

Step 3: Secure your fabric
Line up the center of your waste fabric with the center of your towel and fasten the waste fabric securely.
Ensure that the waste fabric is on straight and very flush to the towel. 
If you are doing a larger piece of work I would suggest sewing the fabric down with a few large baste stitches, but for a small project like this a few pins work just fine.

Step 4: 
Find the center 
of your pattern
This is my pattern, 
I used a pattern maker which you can 
download for free here

The arrow is pointing to a small mark I put on my pattern so I can keep track of the center of my pattern. This mark indicates the center of your waste fabric, all stitches should be done in relation to this mark. 
If you mess this up your pattern will end up off center on your towel so double check!
Ripping out stitches really sucks.

Step 5: Removing the waste fabric
All done!

Trim the excess waste fabric from around the design.
Hang on to those scraps! 
I use decent sized pieces to put tiny bits of embroidery on baby clothes.

Fray the edges by pulling the threads out one at a time both length wise and width wise.

You may want a pair of tweezers to help pull out the threads that are under the embroidery.
Be patient and pull in a smooth motion, don't jerk or snap as you'll just end up breaking the thread you are trying to pull out. 
It's a lot like tweezing your eyebrows! 
Seriously, use that same even motion.

 Step 6: Finishing
Turn your work over and using a very pointed pair of scissors snip any stray threads and ends off.
The back of your work should look like this, very clean with nothing hanging out.

With the iron on medium press both the front and back side of your work.
Use a clean cloth like a pillow case or tea towel to cover your embroidery, this will protect it from the direct heat of the iron.

 Step 7: Admire Your Work
Since I had so much embroidery floss and waste fabric left over I decided to make another set of hand towels. I was going for a "His & Her" kind of feel except with a little more personality. I liked the cheekiness of the "Yours & Mine" set.
It's more fun than the traditional "His & Hers" hand towels.

If you like the "Yours & Mine" towels 
and want to make some for yourself 
you can get the chart here:


Monday, May 2, 2011

How To Monday

Once again I have about zero interest in studying, I really should as the final is tomorrow at 9am, but I just can't get there. So instead I figured I would give you a quick how to on adding beads into a simple chain stitch.


Beaded Chain Stitch How To:


1. Thread beads onto the your thread


2. Make your slip knot and insert 
crochet hook.


3. Make a couple of chain stitches first.
The slide the first bead to the base of
the last stitch made.


4. Pull up enough of a loop to go 
over the bead, as you would for a 
normal chain stitch


6. Yarn over the hook, just like 
in a regular chain stitch.


7. Pull yarn through, making a new 
stitch with the bead contained within.
Pull it to tighten and make the bead 
sit securely.

That's it! Really, seriously easy isn't it? Now you know the trick to making simple necklaces like this one,


Click on the image above to enter my giveaway for that very necklace!

Now go give it a try!

Wednesday, March 30, 2011

Vlogging Vednesday

  This is for everyone who asked me "how do you do that?" when they see me and my little crochet hook going at it.  I finally figured out how to use Mr.C's webcam and recorded a quick video on how to crochet. If you have been doing this for a long time and just looking for patterns, try the "My Patterns" tab. Otherwise you can take a look at my video blog entry (Vlog) and then bop on over to Adeline's Daddy who started this whole thing and check out all the other great How To Vlogs!

Vloggin' Vednesdays


And now with out further ado, or excuses, here is my very first Vlog. Hope you like it!