Remember those monogrammed hand towels I showed you?
I thought you might like to know how I did it.
Here's how you do it.
Waste Fabric Tutorial
Step 1.
Measure and cut out the appropriate amount of waste fabric.
Remember those blue lines indicate
5 stitch increments,
not the ten that are blocked out on patterns.
I made this mistake.
Step 2: Finding the center
Fold your fabric in half lengthwise.
then fold it in half width wise
This gives you the center of the material,
mark it with a pin.
Step 3: Secure your fabric
Line up the center of your waste fabric with the center of your towel and fasten the waste fabric securely.
Ensure that the waste fabric is on straight and very flush to the towel.
If you are doing a larger piece of work I would suggest sewing the fabric down with a few large baste stitches, but for a small project like this a few pins work just fine.
Step 4:
Find the center
of your pattern
This is my pattern,
I used a pattern maker which you can
download for free here
The arrow is pointing to a small mark I put on my pattern so I can keep track of the center of my pattern. This mark indicates the center of your waste fabric, all stitches should be done in relation to this mark.
If you mess this up your pattern will end up off center on your towel so double check!
Ripping out stitches really sucks.
Step 5: Removing the waste fabric
All done!
Trim the excess waste fabric from around the design.
Hang on to those scraps!
I use decent sized pieces to put tiny bits of embroidery on baby clothes.
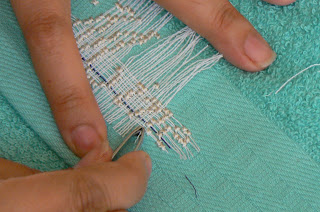
Fray the edges by pulling the threads out one at a time both length wise and width wise.
You may want a pair of tweezers to help pull out the threads that are under the embroidery.
Be patient and pull in a smooth motion, don't jerk or snap as you'll just end up breaking the thread you are trying to pull out.
It's a lot like tweezing your eyebrows!
Seriously, use that same even motion.
Step 6: Finishing
Turn your work over and using a very pointed pair of scissors snip any stray threads and ends off.
The back of your work should look like this, very clean with nothing hanging out.
With the iron on medium press both the front and back side of your work.
Use a clean cloth like a pillow case or tea towel to cover your embroidery, this will protect it from the direct heat of the iron.
Step 7: Admire Your Work
Since I had so much embroidery floss and waste fabric left over I decided to make another set of hand towels. I was going for a "His & Her" kind of feel except with a little more personality. I liked the cheekiness of the "Yours & Mine" set.
It's more fun than the traditional "His & Hers" hand towels.
If you like the "Yours & Mine" towels
and want to make some for yourself
you can get the chart here:


No comments:
Post a Comment